iOS Setup
This tutorial will guide you through integrating the iOS bindings into an Xcode project. Before you begin, make sure you’ve completed the "Getting Started - 3. Mopro build" process with selecting iOS platform and have the MoproiOSBindings folder ready:
MoproiOSBindings
├── mopro.swift
└── MoproBindings.xcframework
Watch the demo video below for a step-by-step guide to integrating the bindings into Xcode, or follow the written instructions that follow.
In this example, we use Circom circuits and their corresponding .zkey files. The process is similar for other provers.
0. Initialize an XCode project
First let's make a new iOS app Xcode project. If you already have an app project you can skip this step. We'll do File -> New -> Project and create an iOS App. Make sure the language is Swift. We suggest putting this iOS project inside the rust project folder created above.
1. Drag the MoproiOSBindings folder into the project
Your Xcode project should be open now. Open Finder and drag the MoproiOSBindings folder into the project folder structure.

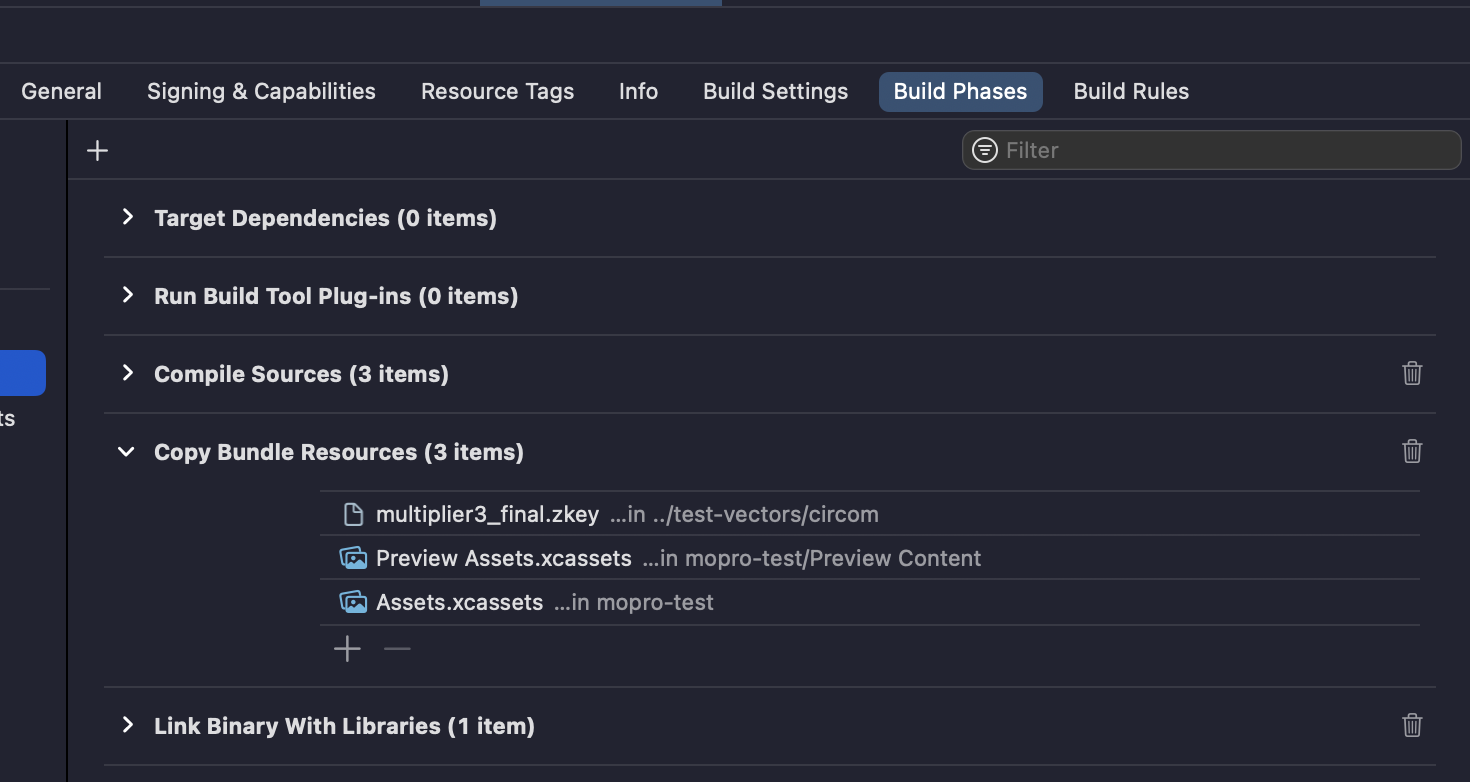
2. Place proving keys into the project
Next drag in any key you plan to prove with. Go to the project Build Phases and add each key to the Copy Bundle Resources step.
Now you're ready to write the proving code in your app!
Although relative paths may work locally in Rust, the proving keys should be copied into the project to ensure they are accessible by the mobile app.
3. Proving from the app
In your project there should be a file named ContentView. At the top of this file add the following:
import moproFFI
This will make the proving functions generateCircomProof and verifyCircomProof available in this module.
In the ContentView itself add a private variable and a button like this:
struct ContentView: View {
    private let zkeyPath = Bundle.main.path(forResource: "multiplier3_final", ofType: "zkey")!

    var body: some View {
        VStack {
            Button("Prove", action: runProveAction)
        }
        .padding()
    }
}
We use the Bundle api to retrieve the full path to our zkey. Change multiplier3_final to the name of your zkey.
At the bottom of this file we'll add an extension with a function to generate a proof. In this example we're going to prove a simple circuit that accepts two inputs named a and b and generates an output c.
extension ContentView {
    func runProveAction() {
        // Prepare inputs
        //
        // The generateCircomProof function accepts an absolute path
        // to the zkey, and a map of strings to arrays of strings
        //
        // This is a mapping of input names to values. Note that if
        // the input is not an array, it will still be specified as
        // and array of length 1.
        let input_str: String = "{\"b\":[\"5\"],\"a\":[\"3\"]}"

        // Begin timing our proof generation
        let start = CFAbsoluteTimeGetCurrent()

        // Call into the compiled static library
        do {
            let generateProofResult = try generateCircomProof(zkeyPath: zkeyPath, circuitInputs: input_str, proofLib: ProofLib.arkworks)
        } catch {
            print("Error generate a proof: \(error)")
        }

        let end = CFAbsoluteTimeGetCurrent()
        let timeTaken = end - start
        print("built proof in \(String(format: "%.3f", timeTaken))s")
    }
}
You should now be able to run the iOS app on the simulator or a device and build a proof. The app should log the time taken to generate the proof. For a more complete example including serialization and verification check here.
4. What's next?
-
Update your ZK circuits as needed. After making changes, be sure to run:
mopro build
mopro updatewarningmopro updateonly works if the Android project was created within the Rust project directory during mopro init. Otherwise, you can manually update the bindings by following Step 1.This ensures the bindings are regenerated and reflect your latest updates.
-
Build your mobile app frontend according to your business logic and user flow.
-
Expose additional Rust functionality: If a function is missing in Swift, Kotlin, React Native, or Flutter, you can:
- Add the required Rust crate in
Cargo.toml - Annotate your function with
#[uniffi::export](See the Rust setup guide for details).
Once exported, the function will be available across all supported platforms.
- Add the required Rust crate in